
Side Dishes
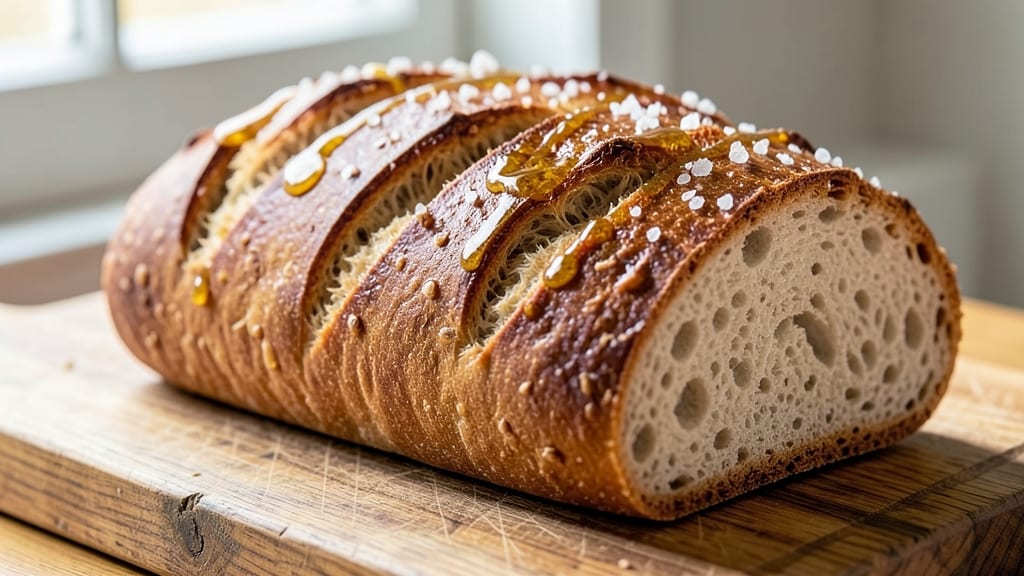
This all-natural bread recipe delivers a wholesome, whole-grain loaf with a crispy crust and tender interior—no preservatives, just pure, unprocessed ingredients. 💛 The secret lies in combining whole wheat flour with a touch of honey for natural sweetness, creating a loaf that's as nutritious as it is delicious.
I've perfected this method over years of baking, ensuring every slice is packed with fiber and flavor without compromising texture.
The process is straightforward yet rewarding: we'll mix, knead, proof, and bake using traditional techniques that build flavor naturally. Unlike commercial breads, this recipe avoids additives while delivering a satisfying chew and golden-brown crust.
The result? A loaf that's perfect for sandwiches, toast, or simply enjoying with butter—restaurant-quality at home without the guilt.
What sets this bread apart is its versatility. Add seeds, herbs, or even a sprinkle of flaxseeds before baking for extra nutrition and texture. The no-preservative formula keeps it fresh longer, making it ideal for meal prep.
Whether you're a seasoned baker or just starting, this recipe builds confidence with foolproof steps and predictable results.
Ready to bake bread that nourishes as much as it satisfies? Let's get started with a method that honors tradition while fitting seamlessly into modern lifestyles. The kitchen will smell like home before the first slice is even cut.
Ingredients for all natural bread
Wholesome whole-grain ingredients meet traditional baking for a loaf that's both nutritious and restaurant-quality.
| Ingredient | Amount | Notes |
|---|---|---|
| Organic Whole Wheat Flour 🌾 | 4 cups | High-protein for structure and fiber |
| Unbleached All-Purpose Flour 🌾 | 1 cup | Balances texture and rise |
| Raw Honey 🍯 | ¼ cup | Natural sweetener and yeast activator |
| Active Dry Yeast 🍞 | 2 ¼ tsp | Ensure freshness within expiration date |
| Warm Water 💧 | 1 ¼ cups | 110°F for optimal yeast activation |
| Extra-Virgin Olive Oil 🫒 | ¼ cup | High-quality for flavor and crust |
| Diamond Crystal Kosher Salt 🧂 | 1 ½ tsp | Fine grain for even distribution |
| Ground Flaxseeds 🌰 | 1 tbsp | Adds nutrition and omega-3s |
| Sesame Seeds 🌱 | 1 tbsp | For texture and visual appeal |
| Cornmeal 🌽 | ¼ cup | Prevents sticking during baking |
| Ice Water ❄️ | ½ cup | For final dough adjustment |
The foundation begins with organic whole wheat flour—look for King Arthur or Bob's Red Mill for optimal protein content. High-protein flour (12-14% protein) is essential for that satisfying chew without compromising rise. Store-bought flours often lose potency after 3 months, so check your pantry date. For the honey, local raw honey adds subtle floral notes and activates yeast more effectively than processed varieties. The yeast should be fresh and within expiration—test it by dissolving a pinch in warm water with a pinch of sugar; if it foams within 5 minutes, it's active. Whole Foods or Trader Joe's carry reliable brands, but bulk bins at natural markets often offer better value.
No honey? Maple syrup or agave nectar work in a 1:1 ratio, though they may alter flavor subtly. Short on flaxseeds? Chia seeds or extra sesame seeds maintain nutrition. The olive oil should be extra-virgin—look for California or Italian varieties at Whole Foods or gourmet sections of major supermarkets for the best flavor. For the flours, sift before measuring to prevent dense pockets in the bread. The cornmeal acts as a non-stick barrier, so don't skip it—it's what gives that perfect golden crust. If your kitchen is humid, reduce water slightly to prevent a gummy texture.
This dough keeps best at room temperature for up to 24 hours wrapped in a damp towel, but for longer storage, portion and freeze for 3 months. Thaw overnight in the fridge before baking. The baked loaf stays fresh 5-7 days when wrapped in a clean kitchen towel (better than plastic for moisture retention). For meal prep, slice and freeze individual portions—they toast beautifully straight from frozen. The honey and flaxseeds can be stored in airtight containers in your pantry for up to 1 year, while the yeast should be kept in the fridge to extend freshness.
Why You'll Love This Recipe
- No-Knead Magic: I swear by this—just mix, let it rise, and bake. The whole process feels like a warm hug for your weekends, no fancy techniques required.
- Honeyed Crust Perfection: That raw honey isn’t just for sweetness—it caramelizes into a golden, buttery crust that’ll make you forget store-bought ever existed. (Yes, even my skeptical husband agrees.)
- Weeknight Meal MVP: Toss it with olive oil and balsamic for a quick charcuterie board, or use it to soak up marinara like a dream. It’s the one loaf that does double duty without effort.
- Budget-Friendly Staple: Whole wheat and honey keep it nutritious, but the cost is shockingly low—one batch feeds my family for days, and the leftovers? Toasted into croutons or sandwiches, they disappear fast.
Step-by-step instructions for all natural bread with whole-grain crust
This method delivers a perfectly textured loaf with a crisp crust and tender crumb—every time.
👨🍳 Step 1: Activate the Yeast with Honey and Warm Water
In a small bowl, combine the 1.25 cups warm water (should feel like bathwater, around 110°F) with the 0.25 cup raw honey and stir until fully dissolved. Sprinkle the 2.25 tsp active dry yeast over the surface and let sit for 5-10 minutes until frothy. You'll see bubbles form and the mixture become effervescent—this confirms your yeast is alive and ready to work.
I always test the water temperature with my finger first—it should feel pleasantly warm but not hot. If your yeast doesn't activate, try fresh yeast or slightly warmer water. The honey here serves a dual purpose: it feeds the yeast while adding subtle sweetness to the finished bread.
👨🍳 Step 2: Mix the Wet and Dry Ingredients
In a large mixing bowl, combine the 4 cups organic whole wheat flour, 1 cup unbleached all-purpose flour, 1.5 tsp diamond crystal kosher salt, 1 tbsp ground flaxseeds, and 1 tbsp sesame seeds. Create a well in the center and pour in the yeast mixture along with the 0.25 cup extra-virgin olive oil. Using a wooden spoon or dough whisk, gradually incorporate the dry ingredients into the wet, mixing until a shaggy dough forms.
This is where the flaxseeds and sesame seeds add both nutrition and texture—you'll notice their nutty aroma developing as they mix. Don't overwork the dough at this stage; you're just bringing everything together. The whole wheat flour will make this dough denser than white flour bread, so resist the urge to add extra liquid.
🍳 Step 3: Knead Until Elastic and Smooth
Turn the dough onto a lightly floured surface and knead for 8-10 minutes until smooth and elastic. I use a bench scraper to cut and fold the dough, which helps develop gluten more efficiently. The dough should spring back slowly when poked and feel slightly tacky but not sticky.
Here's the thing—whole wheat dough behaves differently than white flour dough. It won't be as smooth or elastic, but it should still hold together when rolled into a ball. If it feels too dry, add 1 tablespoon of ice water at a time until it comes together properly. The goal is a dough that's firm enough to hold its shape but still pliable.
⏰ Step 4: First Rise and Shape the Loaf
Lightly oil a large bowl, place the dough inside, and cover with a damp kitchen towel. Let it rise in a warm place for 1-1.5 hours until nearly doubled in size. You'll know it's ready when the dough feels light and springs back when gently pressed.
Punch down the dough to release air, then shape it into a round loaf on a parchment-lined baking sheet. I like to create a well in the center—this will help the bread expand properly in the oven. Sprinkle the 0.25 cup cornmeal evenly over the surface to prevent sticking and add a rustic texture.
🔥 Step 5: Bake to Golden Perfection
Preheat your oven to 375°F with a baking stone or inverted baking sheet on the lower rack for 30 minutes. This creates steam that gives your bread a crisp crust. Bake the loaf for 35-40 minutes until the crust is deep golden brown and sounds hollow when tapped on the bottom.
The internal temperature should reach 190-200°F at the center. I like to tent the loaf loosely with foil after 20 minutes to prevent over-browning if your oven runs hot. Let it cool on a wire rack for at least 30 minutes before slicing—this prevents a gummy crumb. The sesame seeds should be toasted and fragrant, adding a delightful crunch to each bite.
Pro Tips For Making All Natural Bread
- Bloom the Yeast First: Skip mixing yeast straight into dry flour—it’s a rookie move. Instead, dissolve the yeast in warm water (105–110°F) with a pinch of honey first, then let it sit for 5–10 minutes until frothy. Whole wheat flour’s natural acids can kill yeast on contact, and this step guarantees your bread rises properly. (Yes, even if you’re impatient like me.)
- Sift the Whole Wheat: Whole wheat flour is dense and packed with bran, which means uneven mixing and a tougher crumb. Lightly sift it before combining with all-purpose flour—just a quick shake through a mesh strainer—so the yeast and honey distribute evenly. I learned this the hard way when my first batch turned out rock-hard in the middle.
- Don’t Over-Knead the Dough: Whole wheat dough is stubborn and wants to stick to everything. Knead just until it’s smooth and elastic (about 8–10 minutes by hand), then stop—overworking it develops gluten too much, making the bread dense. If it feels tough, you’ve gone too far. (Your arms will thank you too.)
- Use a Dutch Oven for Crust: Baking this bread in a heavy Dutch oven traps steam, giving you that perfect chewy crust and soft interior without adding extra water. If you don’t have one, wrap the loaf tightly in foil during the first 20 minutes of baking, then uncover for the last 10. The difference in texture is night and day.
Make-ahead tips for leftovers
Dough Prep Ahead
Mix the dough up to 24 hours before baking and store it in an airtight container in the fridge. The cold slows yeast activity, letting flavors develop deeper. When ready to bake, let the dough sit at room temperature for 1-2 hours before shaping and baking.
This trick saves time on busy mornings and enhances flavor complexity. 💫
Freeze for Later Baking
Shape the dough into a loaf, wrap tightly in plastic wrap, then place in a freezer bag for up to 3 months. When ready to bake, thaw overnight in the fridge, then proceed with proofing and baking as directed.
The cold rise works surprisingly well—just add 10-15 extra minutes to the baking time. Perfect for meal prep Sundays!
Pre-Sliced Storage
Bake a full loaf, let it cool completely, then slice with a serrated knife into ½-inch thick portions. Store slices in a paper bag at room temperature for 3-4 days or freeze for 2 months.
Toast straight from frozen for crispy, fresh-tasting bread. The sesame seeds stay crunchy even after freezing. 🌾
Batch Baking Tips
Double the recipe and bake two loaves simultaneously on the middle and lower racks. Use parchment-lined baking sheets for easy removal. For even baking, rotate the pans halfway through. This method cuts active time in half while maintaining perfect texture. Just
Reviving Stale Bread
If your bread loses freshness, revive it by wrapping in a damp towel and microwaving for 10-15 seconds. For extra crispiness, sprinkle with water and toast in a 350°F oven for 5 minutes. The honey and olive oil in this recipe help retain moisture better than standard breads. This trick works best within 2-3 days of baking. 💡
Gift-Worthy Packaging
For homemade gifts, wrap cooled loaves in brown paper bags tied with twine. Add a small jar of homemade jam or a sprinkle of flaky sea salt for a complete gift.
Store in a cool, dark place for up to 1 week before gifting. The rustic presentation makes it feel special without extra effort. Perfect for holidays or teacher appreciation gifts! 🎁
Nutrition facts
Frequently asked questions
Can I substitute honey with another sweetener in this recipe?
Yes! For a 1:1 substitution, use maple syrup or agave nectar, though they may slightly alter the flavor profile. If you prefer no sweetener, reduce the water by 2 tablespoons and omit it entirely—just know the bread will be less tender. The honey also activates the yeast, so substitutions may require an extra 5 minutes for proofing.
Why did my whole wheat bread turn out dense instead of light?
Whole wheat flour absorbs more water and lacks gluten strength compared to white flour, so density is common. To improve texture, ensure you kneaded for the full 8-10 minutes and didn't over-hydrate the dough. Try replacing 1 cup of whole wheat flour with all-purpose flour for a lighter crumb, or add 1 teaspoon vital wheat gluten to boost elasticity.
How can I make this bread gluten-free?
This recipe isn't naturally gluten-free, but you can adapt it using a 1:1 gluten-free flour blend (like Bob's Red Mill) plus ½ teaspoon xanthan gum. Replace the whole wheat and all-purpose flours, and increase the honey to ⅓ cup to compensate for reduced gluten structure. Proofing time will likely double—monitor closely for 2-3 hours until doubled in size.
Can I add fresh herbs or vegetables to this dough?
Finely chop 1-2 tablespoons of fresh herbs (like rosemary or thyme) or grated vegetables (zucchini or carrot) and fold them into the dough during the final kneading. For heartier additions like sun-dried tomatoes, reduce the water by 1 tablespoon to prevent a gummy texture. Avoid moisture-heavy ingredients like tomatoes without adjusting the recipe.
What's the best way to reheat stale bread?
For crispy toast, slice the bread and toast in a 375°F oven for 5-7 minutes with a sprinkle of water. For sandwiches, wrap slices in a damp paper towel and microwave for 10-15 seconds**. The honey and olive oil in this recipe help retain moisture longer than standard breads, so it revives better without becoming soggy.