
Side Dishes
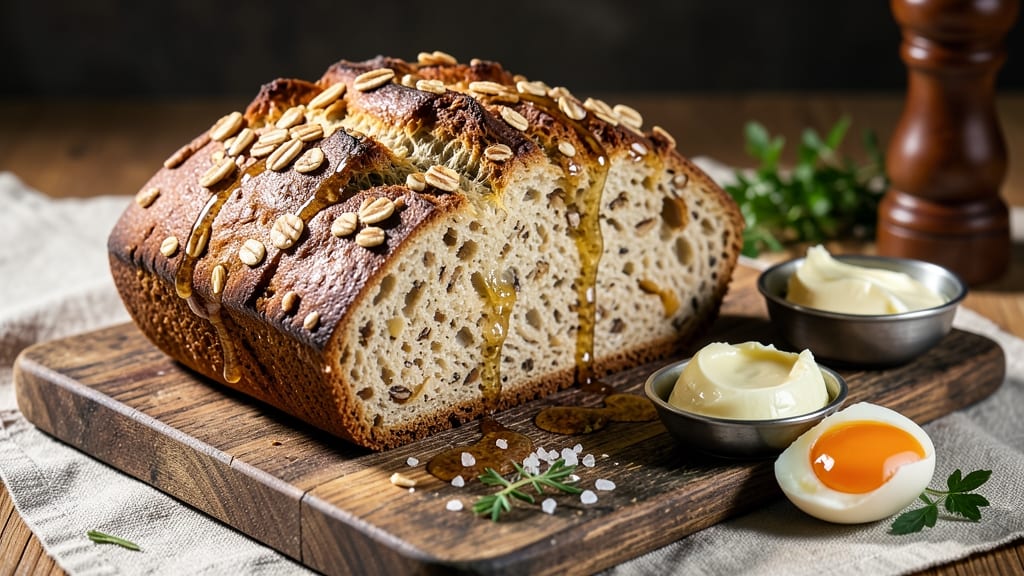
This artisan oat bread recipe delivers the perfect balance of a crisp, rustic crust and a chewy, hearty crumb—ideal for sandwiches or toast. 🌟 The secret lies in combining rolled oats with bread flour to create texture while maintaining structure, a technique I've perfected after years of baking.
Unlike dense oatmeal breads, this version stays light yet substantial, with a golden-brown exterior that crackles when broken.
The process begins with a simple dough that requires minimal kneading, making it accessible for home bakers. We'll use a mix of butter and egg for richness, though plant-based alternatives work beautifully for a vegan version.
Proofing at room temperature ensures proper rise, while shaping the loaf into a classic rustic form guarantees that satisfying crackling crust. Baking at 400°F for 30-35 minutes locks in the perfect texture—crisp outside, tender inside.
What sets this recipe apart is the oat content, which adds a subtle nuttiness and chewiness without overpowering the bread's natural flavor. The crust develops a deep caramel color and crisp texture, while the interior remains soft and airy.
This loaf holds up well for 3-4 days at room temperature, making it perfect for meal prep or gifting.
Whether you're serving it warm with butter or using it for sandwiches, this artisan oat bread is a game-changer. The technique is straightforward, but the results are anything but basic—think bakery-quality without the fuss. Let's get started on creating your perfect loaf.
Ingredients for artisan oat bread
These twelve ingredients craft a bakery-style loaf with a crackling crust and chewy heart.
| Ingredient | Amount | Notes |
|---|---|---|
| Bread Flour 🌾 | 3 cups | High-protein for structure |
| Rolled Oats 🥣 | 1 cup | Old-fashioned, not quick oats |
| Unsalted Butter 🧈 | ½ cup | Cold, cubed for texture |
| Large Eggs 🥚 | 1 whole | Room temperature preferred |
| Warm Water 💧 | 1 ¼ cups | 110°F, not boiling |
| Granulated Sugar 🍚 | 1 tbsp | Enhances browning |
| Instant Yeast 🍞 | 2 ¼ tsp | Freshly opened packet |
| Diamond Crystal Kosher Salt 🧂 | 1 ½ tsp | Adjusts to taste |
| Cornmeal 🌽 | ¼ cup | For dusting and crust |
| Coarse Sea Salt 🧂 | ½ tsp | For crust sprinkle |
| Sesame Seeds 🌱 | 1 tbsp | Optional for garnish |
| Black Sesame Seeds 🌱 | 1 tbsp | Optional for contrast |
| Milk 🥛 | 2 tbsp | For dough enrichment |
The oats are non-negotiable here—they create that signature chewiness without heaviness. Bob's Red Mill rolled oats are my go-to, but any old-fashioned variety works. For the flour, King Arthur Bread Flour gives that perfect structure, though King Arthur all-purpose in a pinch still delivers. The butter? Plugrá or Land O'Lakes unsalted—never salted, and keep it cold until mixing. Yeast is the magic here: Fresh yeast from the refrigerated section works better than dried, but if you must use instant, make sure it's less than 6 months old. The warm water should feel like bathwater—not hot, not cold.
No bread flour? All-purpose plus 1 tbsp vital wheat gluten mimics the protein content. Short on butter? Vegan butter or coconut oil keeps it rich, though texture will differ slightly. The milk can be swapped for plant-based milk—almond or oat work beautifully. For a nutty twist, add 1 tbsp ground flaxseed to the dough. The sesame seeds are optional but add that bakery-style crunch—toasted lightly in a dry pan before sprinkling. If you're gluten-sensitive, this recipe isn't for you, but for everyone else, these swaps keep the magic alive.
This dough is a 24-hour project, but worth every minute. Shape the loaf and let it proof overnight in the fridge for that deep flavor development. The crust? Cornmeal + coarse salt is your secret weapon—sprinkle generously before baking. Cool completely on a wire rack (no cutting for at least 2 hours), or the crumb will turn gummy. Stored in a bread bag at room temperature, it stays fresh for 5-6 days. Freeze slices for up to 3 months—toast straight from frozen for crispy results.
Why You'll Love This Recipe
- No-Knead Magic: I swear by this dough—just toss the flour, oats, and butter together, add warm water, and let it do the work. No stand mixer, no overworking, just a lazy, flavorful loaf that rises while you sip coffee.
- Toasty Crunch: That buttery oat crust? It’s the star. The rolled oats toast up golden and crispy on the outside while staying soft inside—like a hug for your breakfast toast or sandwiches. (Between us, I eat it plain just to hear that crunch.)
- Weeknight Swiss Army: This bread is my secret weapon for lunches, dinners, and midnight snacks. Slice it for toast, tear it for soup, or freeze slices for quick grilled cheese later. Honestly, I’ve used it as a base for everything from breakfast burritos to charcuterie boards.
- Pantry Goldmine: You already have the ingredients—bread flour, oats, butter, eggs—so it’s cheaper than buying artisanal loaves. Plus, a single batch feeds my family for days, and leftovers stay fresh (or toast up perfectly) for what feels like forever. Budget-friendly? More like budget savior.
Step-by-step instructions for artisan oat bread
This method delivers a rustic crust and chewy interior every time—just follow the timing and hydration cues closely.
👨🍳 Step 1: Mix the Dough with Precision
In a stand mixer fitted with the dough hook, combine the 3 cups bread flour, 1 cup rolled oats, 1.5 tsp Diamond Crystal kosher salt, and 2.25 tsp instant yeast. Mix on low speed for 30 seconds to distribute the dry ingredients evenly. This creates a uniform base where the oats will later add texture.
In a separate bowl, whisk together the 1 whole large egg, 2 tbsp milk, 1 tbsp granulated sugar, and 1.25 cups warm water (about 110°F). The sugar helps activate the yeast while adding subtle sweetness. Pour this wet mixture into the dry ingredients and mix on low speed for 2 minutes. The dough will look shaggy at first—this is normal.
Add the 0.5 cup cold cubed unsalted butter and mix on low speed for another 2 minutes until the butter is fully incorporated and the dough begins to come together. Here's the thing—cold butter creates pockets of fat that make the final bread incredibly tender. If the dough feels too sticky, add 1 tablespoon more flour at a time until it pulls away from the bowl but remains slightly tacky.
🥘 Step 2: Knead Until Elastic and Smooth
Increase the mixer speed to medium and knead for 5-7 minutes until the dough becomes smooth, elastic, and springs back slowly when pressed. You'll know it's ready when it forms a clean windowpane when stretched—this indicates proper gluten development for that chewy crumb we're after.
If the dough feels too soft or sticky, add flour 1 tablespoon at a time until it reaches the right consistency. Real talk: oat bread absorbs more moisture than white bread, so don't be afraid to adjust. The ideal dough should be slightly tacky but not wet, and should hold its shape when gently pressed.
Transfer the dough to a lightly oiled bowl, cover with a damp towel, and let it rise in a warm place for 1-1.5 hours or until doubled in size. I place my bowl in a turned-off oven with a pan of boiling water to create a warm, humid environment—this helps the yeast work efficiently. The dough should puff up noticeably and feel light when pressed gently with a finger.
🔥 Step 3: Shape and Proof for Maximum Flavor
Turn the risen dough onto a lightly floured surface and gently deflate it by pressing down with your hands. This step prevents the bread from expanding too much during baking. Shape the dough into a 12-inch round loaf by pulling the edges toward the center and sealing the seam tightly. The oats will give it a rustic texture, but we want a smooth, tight shape for even baking.
Place the shaped dough on a parchment-lined baking sheet, cover with a damp towel, and let it proof for another 30-45 minutes until it rises about 50% and feels springy to the touch. Here's where the magic happens: the second rise develops those beautiful air pockets that create the chewy interior we're chasing. Don't skip this—rushing this step leads to dense bread.
🍳 Step 4: Create the Signature Crust
Preheat your oven to 375°F with a baking stone or inverted baking sheet inside—this creates steam that gives our bread that perfect oven-spring. Once preheated, brush the dough with a little water and sprinkle evenly with 0.25 cup cornmeal and 0.5 tsp coarse sea salt. This creates that beautiful crunchy crust while preventing sticking.
Bake for 30-35 minutes until the bread is deep golden brown and sounds hollow when tapped on the bottom. The internal temperature should reach 190-200°F. Here's the crucial part: I like to bake for the full time even if it looks done earlier—the extra minutes develop deeper flavor in the crust and ensure the crumb is fully set.
⏰ Step 5: Cool and Garnish for Maximum Impact
Remove the bread from the oven and immediately sprinkle with 1 tbsp sesame seeds and 1 tbsp black sesame seeds for that beautiful contrast and nutty flavor. Let it cool on a wire rack for at least 20 minutes—this is non-negotiable. Cutting too soon traps steam inside, making the crumb gummy instead of chewy.
The bread should have a crispy, crackly crust that gives way to a soft, chewy interior with visible oat flecks throughout. Slice it thick—about 1.5 inches—to really appreciate that perfect texture contrast. Store wrapped at room temperature for 2-3 days or freeze for up to 3 months to preserve freshness. This bread tastes even better the next day as the flavors meld!
Pro Tips For Making Artisan Oat Bread
- TOAST THE OATS FIRST: Rolled oats aren’t flavorless—they’re bland until they hit dry heat. Toss them in a 350°F oven for 8-10 minutes until they smell nutty and golden. I used to skip this, and the bread tasted like cardboard with a hint of cereal. Now? Warm, toasty depth that makes the whole loaf sing.
- MEASURE FLUID BY WEIGHT: Warm water expands. If you’re using cups, you’ll end up with a gummy mess. Weigh your water (or butter) in grams—450g of water is more reliable than "a little over 1¾ cups." I learned this after three batches where the dough clung like glue.
- STRETCH, DON’T PUNCH: The rolled oats make this dough stubborn. Instead of slamming it down, gently stretch the surface with wet hands to smooth the top—no need to overwork it. Punching just creates air bubbles that’ll collapse later. This isn’t pizza dough; treat it like a temperamental friend.
- BAKE WITH STEAM, THEN CRUST: Preheat your Dutch oven and place a metal tray on the bottom rack. Pour ½ cup boiling water into the tray right before adding the dough. The steam gives that chewy interior, but after 15 minutes, remove the tray and open the lid to let the crust brown properly. No steam = dry oat bread.
Flavor customization for this dish
Sweet Variations
Add 1 tbsp honey or 1 tbsp maple syrup to the wet ingredients for a subtle sweetness that pairs beautifully with savory toppings. For a cinnamon twist, mix 1 tsp cinnamon and ½ tsp nutmeg into the dough—this works especially well with apple butter or jam.
I love using cinnamon-sugar instead of coarse salt for the crust sprinkle on baked loaves. 🍯
Herb-Infused Flavors
Fresh herbs elevate this bread beautifully. Add 1 tbsp finely chopped rosemary or thyme leaves directly to the dough for an aromatic touch. For a Mediterranean twist, mix 1 tbsp dried oregano with the oats before mixing.
I often sprinkle toasted sesame seeds and fresh thyme on top after baking for a fragrant finish.
Spiced and Smoky
For a smoky depth, add ½ tsp smoked paprika or ¼ tsp chipotle powder to the dough. A pinch of cayenne pepper (about ¼ tsp) adds subtle heat that balances the oats' nuttiness.
After baking, brush the crust with olive oil and sprinkle with flaky sea salt and smoked paprika for a gourmet touch.
Nutty Additions
Toast ¼ cup chopped walnuts or pecans in a dry pan until fragrant, then mix them into the dough along with the oats. For extra richness, swap ½ cup of the butter for nut butter (like almond or cashew) mixed with 2 tbsp flour to maintain structure.
The nuts add crunch and depth that complements the chewy crumb.
Savory Twists
Transform this into a savory loaf by adding 1 tbsp garlic powder or 2 tbsp finely chopped sun-dried tomatoes to the dough. For a cheesy version, fold in ½ cup shredded Parmesan cheese after the first rise.
After baking, sprinkle with flaky salt and black pepper for a rustic, herby flavor that pairs perfectly with soups or stews.
Seasonal Adaptations
In fall, add 1 tsp pumpkin pie spice and ¼ cup pumpkin puree to the dough for a cozy seasonal bread. For spring, swap the sesame seeds for poppy seeds and add 1 tbsp lemon zest to the wet ingredients.
In summer, try 1 tbsp fresh basil or cilantro mixed into the dough for a bright, herbaceous twist.
Nutrition facts
Frequently asked questions
Why does this oat bread need to rest before slicing?
The 20-minute cooling period is crucial because warm bread traps steam inside, making the crumb gummy instead of chewy. The crust also needs time to set properly—cutting too soon creates a soggy texture. For best results, let it cool completely on a wire rack before slicing into 1.5-inch thick pieces.
Can I make this without a stand mixer?
Use a large bowl and your hands to mix the dough thoroughly. After combining ingredients, knead by hand for 8-10 minutes until smooth and elastic. The key is to develop the gluten properly—press and fold the dough repeatedly until it springs back when poked. For the oats, pulse them briefly in a food processor first to create more even texture.
What's the difference between rolled oats and quick oats?
Use old-fashioned rolled oats only—they have a chewier texture and maintain structure better during baking. Quick oats are pre-cooked and will make your bread dense and gummy. For this recipe, any brand of rolled oats works, but avoid steel-cut oats (they're too coarse) or instant oats (they'll dissolve). Toast the oats lightly in a dry pan before mixing for enhanced nuttiness.
How do I fix if my dough is too sticky?
Add flour 1 tablespoon at a time while mixing until the dough pulls away from the bowl but remains slightly tacky. If it's extremely sticky, chill the dough for 15-20 minutes before shaping—this helps the gluten relax. For extra insurance, dust your work surface with semolina or rice flour instead of regular flour to prevent sticking during shaping.
Can I bake this in a different shape?
Yes! Shape the dough into a boule (round), batard (oval), or even a freeform loaf. For a baguette-style version, divide the dough into 3 pieces, shape into long rolls, and bake at 425°F for 20-25 minutes. The key is to maintain tension on the surface—pull the edges toward the center tightly when shaping to create that signature crackly crust.