
Side Dishes
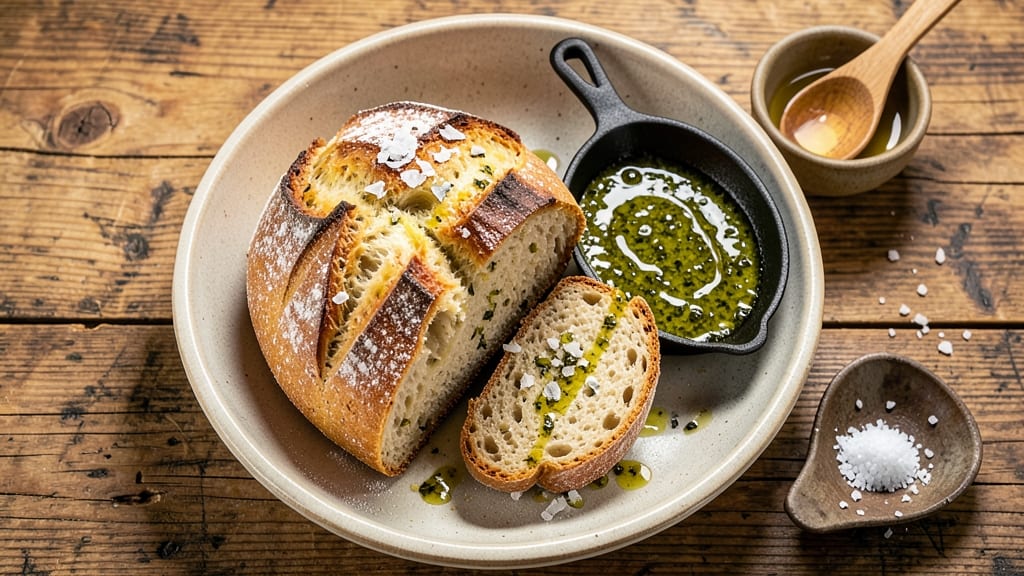
This artisan olive oil bread recipe transforms simple ingredients into a loaf with a crusty golden crunch and fragrant, airy interior. The secret lies in high-quality extra virgin olive oil—its fruity notes and richness elevate every bite, while proper kneading and proofing create that signature texture.
I've perfected this recipe through years of baking, ensuring you get restaurant-quality results at home with just a few essential tools.
The process begins with a straightforward dough made from flour, water, olive oil, yeast, and salt—no fancy ingredients required. What matters most is technique: developing the gluten through proper kneading and allowing ample time for proofing.
The olive oil not only enhances flavor but also contributes to a tender crumb and that coveted crisp crust. This bread stands out from store-bought versions with its authentic, rustic appeal and complex taste profile.
By the time you pull it from the oven, you'll have a loaf with a shatteringly crisp crust that gives way to a soft, fragrant interior infused with olive oil's rich character.
The aroma alone will have everyone gathering around your table. Whether you serve it fresh with meals or toast slices for breakfast, this bread becomes the star of any gathering.
The beauty of this recipe lies in its versatility—use it as a side for soups, pair it with charcuterie, or enjoy it plain with butter. For those who love experimentation, try adding rosemary or whole grains to the dough for exciting variations. Let's get started on creating your perfect loaf.
Ingredients for artisan olive oil bread
Nine simple ingredients transform into a loaf with restaurant-quality crunch and aroma.
| Ingredient | Amount | Notes |
|---|---|---|
| All-Purpose Flour 🌾 | 4 cups | High-protein preferred for chewiness |
| Extra-Virgin Olive Oil 🫒 | ¾ cup | Fruity, peppery variety preferred |
| Active Dry Yeast 🍞 | 2 ¼ tsp | Fresh yeast at half the amount |
| Granulated Sugar 🍚 | 1 tsp | Feeds yeast for activation |
| Warm Water 💧 | 1 ¼ cups | 110°F for optimal yeast activation |
| Kosher Salt 🧂 | 1 ½ tsp | Diamond Crystal preferred |
| Coarse Sea Salt 🧂 | 1 tsp | For crust sprinkling |
| Cornmeal 🌽 | ¼ cup | For dusting baking sheet |
| Semolina Flour 🌾 | 1 tbsp | Optional for extra crunch |
| Ice Water ❄️ | ¼ cup | For final dough adjustment |
The olive oil is non-negotiable here—look for extra-virgin with fruity, peppery notes. California Olive Ranch or Colavita are my go-tos, but any high-quality EVOO will work. The flour matters too: King Arthur or Caputo Tipo 00 give the best texture, but all-purpose in a pinch. Yeast is tricky—if it's old, it won't activate. Check the expiration date and use within a month of opening. For the sugar, white granulated is fine, but honey or maple syrup at half the amount adds subtle sweetness.
No extra-virgin olive oil? Light olive oil works in a bind, but you'll lose that rich flavor. Short on yeast? Instant yeast at the same amount skips the proofing step. The cornmeal is optional but creates that signature crunch on the bottom crust. Semolina is worth it if you want that Italian bakery texture—sprinkle it on the baking sheet before shaping. For the water, room temp is fine, but warm water (110°F) activates yeast faster. If your dough feels too sticky, add ice water 1 tbsp at a time until it comes together.
This dough needs time—at least 2 hours of proofing at room temp. Store it in the fridge overnight for even better flavor. The shaped loaf keeps 3 days wrapped at room temp or 1 week in the fridge. For freezing, bake first, then wrap tightly—reheats beautifully in a 350°F oven for 10 minutes. Slice fresh before serving—toasted slices are even better the next day.
Why You'll Love This Recipe
- No-Yeast Struggle: I’ve ruined bread with yeast more times than I’ll admit. This recipe skips the fuss—just mix, let it rise, and bake. The yeast is pre-dissolved in warm water with that sugar, so it’s ready to go while you’re still deciding what to watch on TV.
- Rich Olive Oil Magic: That first pull-apart moment? Pure satisfaction. The extra-virgin olive oil doesn’t just flavor—it makes the crust golden and the crumb unexpectedly tender. Honestly, I’d argue it’s better than store-bought, and I’m not usually a bread snob.
- Weeknight Workhorse: Toss a loaf in the oven while you prep dinner, and it’s done by the time you’re plating. Slice it thick for sandwiches, tear it for salads, or just eat it straight with butter. My kids call it “the glue that holds dinner together”—and they’re not wrong.
- Budget-Friendly Staple: Five ingredients, zero waste. The dough keeps for days in the fridge, and you can freeze portions for lazy mornings. I’ve made this for $3 a loaf, and it’s the kind of bread that makes even the simplest meal feel special—no fancy ingredients needed.
Step-by-step instructions for artisan olive oil bread
Let's create a rustic loaf with a crackly crust and tender crumb—this is where the magic happens.
Activate the Yeast and Mix the Dough
In a large bowl, combine the 1.25 cups warm water with the 1 tsp granulated sugar and 2.25 tsp active dry yeast. Let this sit for 5-10 minutes until it becomes frothy and bubbly—this tells you your yeast is alive and ready to work. If it doesn't bubble, your yeast might be dead, and you'll need to start over.
Once bubbly, add the 4 cups all-purpose flour and 1.5 tsp kosher salt to the bowl. Stir with a wooden spoon until a shaggy dough forms. Then drizzle in the 0.75 cup extra-virgin olive oil and mix until fully incorporated. The dough should be sticky but manageable—this is normal for olive oil bread.
Knead Until Silky and Elastic
Turn the dough onto a lightly floured surface and knead for 8-10 minutes until smooth and elastic. You'll know it's ready when it springs back slowly when poked and leaves a clean surface. I press down gently with my knuckles—if it bounces back, it needs more kneading.
For the best texture, I like to use the "windowpane test" here: stretch a small piece of dough thin enough to see light through it without tearing. This ensures proper gluten development for that perfect chewy crumb. If the dough feels too sticky, wet your hands slightly to prevent sticking.
First Rise for Maximum Flavor Development
Place the dough in a lightly greased bowl, cover with a damp kitchen towel, and let it rise in a warm spot for 1-2 hours or until doubled in size. I usually put my oven on its lowest setting with a bowl of hot water inside to create a warm, humid environment—this helps the dough rise faster and more evenly.
During this time, the dough will develop those beautiful air pockets that create the tender crumb. Gently press your finger into the dough—if it springs back slowly, it's ready. If it springs back quickly, give it another 30 minutes. Patience here makes all the difference in the final texture.
Shape and Second Rise for Crust Development
Punch down the risen dough to release air, then divide it into 4 equal portions (about 1 pound each). Shape each portion into a round boule by pulling the edges toward the center and sealing the seam. Place them on a baking sheet dusted with 0.25 cup cornmeal and cover again with the damp towel.
Let the shaped boules rise for another 30-45 minutes until they've puffed up noticeably. The dough should feel firm to the touch but still slightly springy. This final rise is crucial for that airy interior we're after. I like to preheat my oven to 425°F during this time to ensure it's ready when the bread is.
Bake to Golden Perfection
Once the dough has risen, sprinkle each boule generously with the 1 tsp coarse sea salt and, optionally, the 1 tbsp semolina flour for extra crunch. Bake in the preheated oven for 25-30 minutes until the crust is deep golden brown and sounds hollow when tapped on the bottom.
For that classic artisan look, I like to spray the oven walls with water right before baking—this creates steam that helps develop the crust. If the tops brown too quickly, tent the bread with foil. The internal temperature should reach 190-200°F for perfect doneness. Let the bread cool on a wire rack for at least 30 minutes before slicing—this prevents a gummy crumb.
Adjust Dough Consistency if Needed
If your dough feels too sticky after kneading, add the 0.25 cup ice water 1 tablespoon at a time until it becomes more manageable. This helps strengthen the gluten structure and improves oven spring. If it's too dry, add 1 teaspoon olive oil at a time to maintain moisture.
This final adjustment ensures your bread will have that perfect balance of crusty exterior and tender interior. The ice water also helps create a tighter crumb structure, which is especially important for olive oil bread where the fat content can sometimes make the dough more challenging to work with.
Pro Tips For Making Artisan Olive Oil Bread
- WEIGH YOUR FLOUR: I learned this the hard way—measuring flour by scooping and scooping from the bag leads to inconsistent batches. Use a kitchen scale for this bread; 500 grams of all-purpose flour (spooned in and leveled) makes a noticeable difference in texture and rise. The olive oil needs a consistent base, and guesswork here ruins the crumb.
- LET THE YEAST BLOOM: Skip the instant yeast shortcut—active dry yeast needs a little wake-up call. Mix it with the warm water (110°F/43°C) and a pinch of sugar first, then wait 5–10 minutes until it’s foamy before adding to the flour. Cold water kills it; too-hot water cooks it. This step guarantees a proper rise, not a dense brick.
- KNEAD JUST ENOUGH: Overworking the dough is the silent killer of artisan olive oil bread. Aim for 8–10 minutes by hand (or 5–6 on speed 2 in a stand mixer) until the dough pulls cleanly away from the bowl. Too much kneading develops gluten excessively, making the bread tough—this recipe relies on olive oil’s richness, not chewiness.
- STEAM THE OVEN: Preheat your oven to 425°F (220°C) with a baking stone or inverted baking sheet inside for 30 minutes. Then, just before baking, pour a cup of boiling water into a small pan on the lower rack. The steam mimics a professional oven’s environment, giving you that crisp crust and airy interior without fighting for moisture. (Yes, even if you’re impatient like me.)
Best sauces and condiments for this artisan olive oil bread
Olive Oil Drizzle
Finish your warm bread with a generous drizzle of extra-virgin olive oil right after baking—about 2 tablespoons per loaf. Use the same high-quality oil you used in the dough for consistency. I like to use a California Olive Ranch or Colavita with fruity, peppery notes for that authentic Italian touch.
Let it cool for 5 minutes before drizzling so the oil soaks into the crust rather than pooling. 🫒
Garlic Confit Spread
Create a simple garlic confit by simmering 6 cloves peeled garlic in ½ cup extra-virgin olive oil with 1 tsp flaky sea salt for 20 minutes at 275°F. Once cooled, mash the garlic into the oil and spread it on warm bread slices.
The garlic's sweetness pairs perfectly with the bread's crusty exterior and tender crumb. Store leftovers in an airtight container for up to 1 week.
Whole-Grain Mustard
Mix 2 tablespoons whole-grain mustard with 1 tablespoon honey and 1 tablespoon olive oil for a tangy-sweet spread. This combination cuts through the bread's richness while complementing its olive oil flavor.
I use Annie's Organic mustard for its bold, textured taste. Spread a thin layer on toasted slices for a breakfast or charcuterie board favorite.
Herbed Olive Oil
Infuse 1 cup extra-virgin olive oil with 1 tbsp fresh rosemary, 1 tbsp fresh thyme, and 2 garlic cloves for 1 hour at room temperature. Strain and drizzle over warm bread or use as a dip for crusty pieces.
This aromatic oil enhances the bread's natural flavors while adding a fragrant herbal note. Store in a dark glass bottle for up to 2 weeks.
Balsamic Glaze
Simmer ¼ cup balsamic vinegar with 1 tbsp honey and 1 tsp Dijon mustard until reduced by half. Drizzle this glossy glaze over warm bread slices for a sweet-tangy contrast.
I recommend Balsamic Crema di Modena for its rich, complex flavor. The glaze adds a sophisticated touch that elevates simple toast to gourmet status. 🍷
Spicy Chili Oil
Combine ½ cup olive oil with 1 tbsp red pepper flakes and 1 tsp smoked paprika, then heat gently for 5 minutes***. Strain and drizzle over warm bread for a kick. This oil adds heat and depth to the bread's olive oil flavor.
For extra richness, add 1 minced garlic clove to the mixture. Store in a sealed jar for up to 1 month.
Nutrition facts
Frequently asked questions
Why does my artisan olive oil bread turn out dense instead of light?
Under-kneading or insufficient proofing are the most common culprits. Olive oil bread requires 8-10 minutes of vigorous kneading to develop proper gluten structure, followed by at least 2 hours of total proofing time. Try using a stand mixer with a dough hook for consistency, and create a warm environment (like a proofing box) to help the dough rise properly. Too much oil can also weigh down the crumb.
Can I make this bread without a stand mixer?
While a stand mixer makes kneading easier, you can achieve excellent results by hand. Use a dough scraper to help turn and fold the dough for 10-12 minutes until it passes the windowpane test. Wet your hands slightly to prevent sticking, and work on a clean, lightly floured surface. The extra effort develops the gluten just as effectively as a mixer.
How do I store leftover artisan olive oil bread?
Wrap cooled bread tightly in plastic wrap or place it in an airtight container to maintain freshness. It stays good at room temperature for 3 days, or you can refrigerate for 1 week. For longer storage, freeze fully baked (but cooled) loaves wrapped in plastic and foil for up to 3 months. Thaw at room temperature before serving—no reheating needed for freshness.
What's the best way to revive stale olive oil bread?
Preheat your oven to 350°F and place slices on a baking sheet. Toast for 5-8 minutes until crispy and golden. For extra flavor, brush with a little olive oil before toasting. Alternatively, wrap slices in damp paper towels and microwave for 20-30 seconds to restore moisture. The olive oil content helps it revive better than regular bread.
Can I substitute butter for olive oil in this recipe?
While possible, I don't recommend it for this specific recipe. Olive oil contributes both flavor and moisture that butter can't replicate—it creates that signature tender crumb and rich taste. If you must substitute, use ½ cup melted butter plus ¼ cup olive oil to maintain some of the olive oil's benefits, but expect a slightly different texture and flavor profile.