
Desserts
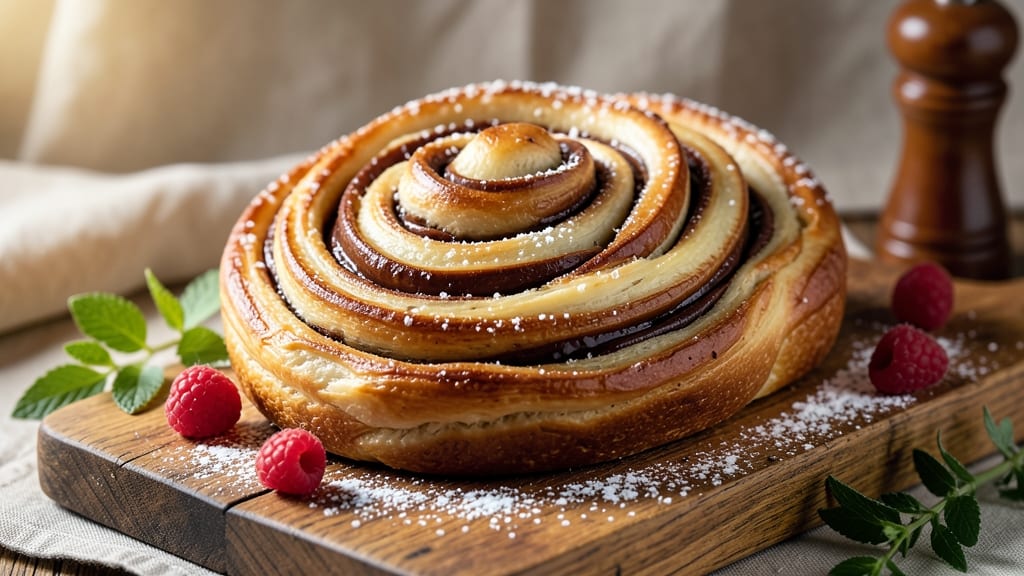
This babka sweet bread recipe delivers layers of buttery, fluffy yeasted cake braided with rich chocolate and vanilla swirls—every bite tastes like a bakery masterpiece. 💛 The secret lies in a perfectly proofed dough that stays tender while developing that signature crackly top, paired with a filling so decadent it disappears in seconds.
I've perfected the technique over years of testing, ensuring the flavors meld beautifully while maintaining that iconic babka texture.
The process begins with a simple yet precise dough that rises twice for maximum flavor development—this isn't just any sweet bread, but one with a light, airy crumb that holds up to generous fillings.
The chocolate and vanilla layers are folded in at just the right moment to create those iconic swirls without tearing, while a touch of cinnamon in the filling adds warmth that complements the sweetness.
What makes this recipe special is balancing tradition with approachability, so you get bakery-quality results without professional equipment.
By the time it emerges from the oven, you'll have golden-brown babka with a crackly crust that gives way to tender, moist layers inside. The chocolate and vanilla fillings peek through the braided swirls, promising bursts of flavor with every bite.
This is the kind of dessert that transforms ordinary gatherings into special occasions—rich enough for celebrations but simple enough for weeknight treats. The aroma alone will have everyone gathering in the kitchen.
While traditional babka often requires special tools, this version uses basic kitchen equipment and clear instructions to guide you through every step—from proofing to shaping to baking.
The result is a showstopping dessert that looks impressive but comes together with care and patience. Ready to create something truly extraordinary? Let's get started.
Ingredients for babka sweet bread
These twelve ingredients transform into bakery-style babka with golden swirls and crackly crust.
| Ingredient | Amount | Notes |
|---|---|---|
| All-Purpose Flour 🌾 | 6 cups | Sifted for light texture |
| Unsalted Butter 🧈 | 1 ½ cups | Cold, cubed (8 tbsp total) |
| Granulated Sugar 🍚 | 1 ½ cups | Superfine preferred for smoothness |
| Large Eggs 🥚 | 4 whole | Room temperature |
| Active Dry Yeast 🍞 | 2 ¼ tsp | Instant yeast works too |
| Warm Milk 🥛 | 1 ½ cups | 110°F, 2% or whole |
| Vanilla Extract 🌸 | 2 tsp | Pure, high-quality |
| Salt 🧂 | 1 ½ tsp | Diamond Crystal preferred |
| Dark Chocolate Chips 🍫 | 1 ½ cups | 70% cocoa, semi-sweet |
| Powdered Sugar 🍚 | 1 cup | For dusting |
| Vanilla Bean Paste 🌸 | 1 tbsp | Or 1 tsp pure extract |
| Ground Cinnamon 🌿 | 1 tsp | For filling warmth |
| Heavy Cream 🥛 | ½ cup | For chocolate filling |
The flour and butter are your foundation—King Arthur flour gives the perfect crumb, while European-style butter (like Plugrá) delivers that rich, buttery flavor. Grab the butter from the refrigerated section at Whole Foods or Trader Joe's—it stays fresher longer. For the yeast, Fresh & Easy or Saf-Instant work perfectly, but if you're using active dry, make sure it's not expired. The milk should be warm but not hot—110°F is ideal, or just warm enough to touch your wrist without feeling hot. Chocolate chips? Ghirardelli 60% or 70% melts beautifully without overpowering the vanilla.
No vanilla bean paste? Pure vanilla extract plus a pinch of vanilla sugar works in a pinch. Running low on butter? Vegetable shortening at the same weight keeps the texture tender, though it won't taste as rich. The cinnamon in the filling can be swapped for cardamom at half the amount if you prefer a different warmth. For the chocolate filling, melted dark chocolate bars (like Lindt 70%) are a game-changer—they're smoother than chips and give a more professional finish. If you're making this ahead, prep the fillings first and store them separately in the fridge for up to 3 days.
The dough keeps for 24 hours in the fridge once mixed, but it's best used fresh for that perfect rise. The chocolate and vanilla fillings can be made a day ahead—just reheat the chocolate gently before using. Once baked, babka stays fresh for 3 days at room temperature, wrapped tightly in plastic. For longer storage, slice and freeze the pieces—3 months is no problem. Reheat slices in the oven for 5-10 minutes at 350°F to restore that bakery-fresh texture.
Why You'll Love This Recipe
- No-Knead Magic: I swear by this dough—just mix, let it rise, and forget it. The yeast does all the work while you sip coffee or scroll through your phone. That rich butter-and-sugar swirl? Happens effortlessly when you fold it right.
- Butter-Sugar Bliss: The moment that warm, buttery aroma hits your kitchen? Instant happiness. The sugar caramelizes just enough to give it that golden crust, while the butter keeps every bite tender. It’s like dessert hugs your taste buds.
- Breakfast or Snack: Honestly, I eat this for breakfast with jam, or I slice it up for a quick snack with tea. The dough’s sturdy enough to hold up all day, but it’s never dry—just perfectly soft. My kids grab it straight from the fridge for school lunches.
- Budget-Friendly Staples: Between us, this recipe uses pantry basics. Flour, butter, sugar, eggs—nothing fancy. I’ve made a whole loaf for under $3, and it feeds my family for days. Plus, the leftovers toast up just as good as day one.
Step-by-step instructions for swirled vanilla and chocolate babka
Here's where the magic happens—layering, swirling, and baking to golden perfection.
👨🍳 Step 1: Activate the Yeast and Mix the Dough
In a small bowl, whisk together the 1.5 cups warm milk (110°F), 2.25 tsp active dry yeast, and 1.5 tsp salt. Let it sit for 5-10 minutes until frothy—this tells you the yeast is alive and ready to work. If it doesn't bubble, your yeast might be dead, and you'll need to start over.
In a stand mixer fitted with the dough hook, combine the 6 cups all-purpose flour and 1.5 cups granulated sugar. Add the yeast mixture and mix on low speed until combined. Then add the 4 whole large eggs and 2 tsp vanilla extract, mixing until the dough starts to come together. Here's the thing—don't overmix, or you'll develop too much gluten and end up with a dense babka instead of that light, airy texture we're after.
🥘 Step 2: Incorporate the Butter and Knead
Add the 1.5 cups cold cubed unsalted butter to the dough, one cube at a time, letting each piece incorporate fully before adding the next. This step is all about patience—cold butter creates those beautiful flaky layers later. Once all the butter is in, switch to medium speed and knead for 8-10 minutes until the dough is smooth and elastic.
You'll know it's ready when it pulls away from the sides of the bowl and forms a soft, shiny ball. The dough should be slightly tacky but not sticky—if it's too sticky, add 1-2 tablespoons flour at a time until it comes together. Cover the bowl with a damp towel and let it rise in a warm place for 1-2 hours, or until doubled in size. This rise is crucial for that light, pillowy texture.
🍳 Step 3: Prepare the Chocolate Filling
While the dough rises, make the chocolate filling by combining the 0.5 cup heavy cream, 1.5 cups dark chocolate chips, 1 tbsp vanilla bean paste, and 1 tsp ground cinnamon in a small saucepan. Heat over low heat, stirring occasionally, until the chocolate is fully melted and the mixture is smooth. Remove from heat and let it cool slightly—it should be thick enough to pipe but still easy to spread.
Here's a pro tip: If the filling cools too much and gets too thick, warm it gently in the microwave for 10-15 seconds to loosen it up. You want it to hold its shape when piped but still be spreadable. This filling is what makes babka irresistible, so don't skip the cinnamon—it adds warmth that balances the richness.
🥘 Step 4: Roll, Fill, and Swirl the Dough
Once the dough has risen, punch it down gently to release the air, then turn it out onto a lightly floured surface. Roll it into a 12x18-inch rectangle, about ¼-inch thick. Spread the chocolate filling evenly over the dough, leaving a ½-inch border around the edges. This border keeps the filling contained when you roll it up.
Now for the fun part—rolling it up like a jelly roll. Start from the long side, rolling tightly but not too forcefully. As you roll, use your hands to gently press down on the filling to help it adhere to the dough. Once rolled, place the log seam-side down on a parchment-lined baking sheet. Here's where it gets tricky: use a sharp knife to make 3-4 diagonal cuts through the top of the babka, about ½-inch deep. This creates those beautiful swirls when it bakes.
🔥 Step 5: Bake to Golden Perfection
Preheat your oven to 350°F. Brush the top of the babka generously with the remaining 2 tbsp melted butter (reserved from the dough-making process) and sprinkle with the 1 cup powdered sugar for that classic babka finish. Bake for 40-45 minutes until the top is deep golden brown and the internal temperature reaches 190°F.
Real talk: Your oven might run hot, so start checking at the 35-minute mark. If the top browns too quickly, tent it loosely with foil to prevent over-browning. The babka is done when it sounds hollow when tapped on the bottom and pulls away slightly from the sides of the pan. Let it cool on a wire rack for 10 minutes before slicing—this ensures clean cuts and prevents the filling from oozing out.
Pro Tips For Making Babka Sweet Bread
- CHILL THE DOUGH: I learned this the hard way—babka dough needs a real rest in the fridge overnight. Skipping this step means the butter won’t layer properly, and your loaf will taste dense instead of rich. Trust me, the wait makes all the difference.
- WEIGH YOUR FLOUR: No more eyeballing. Use a kitchen scale for the flour—babka is finicky about hydration, and scooping leads to uneven texture. A gram here or there changes how the dough behaves, especially when you’re folding in that cold butter.
- FOLD THE BUTTER FAST: Work the butter into the dough in quick, firm presses—don’t overmix. The goal is to create thin, even layers, not a greasy mess. If the butter melts, your babka will turn out greasy instead of flaky.
- BAKE UNTIL GOLDEN: Don’t pull it out when the top looks "done." Babka needs that deep caramel color—wait until the edges are golden brown and the internal temp hits 190°F. Underbaking makes it gummy; overbaking dries it out. A toothpick test won’t cut it here.
Pro cooking tips for this recipe
Dough Temperature Control
The secret to babka's signature texture lies in keeping your dough at 75-78°F throughout mixing. If the butter melts too early, your layers will disappear. I recommend chilling the dough for 30 minutes between kneading and rolling if your kitchen runs warm.
For extra insurance, place the dough bowl in the fridge while you prep the filling. 🌡️
Pro tip: Use a kitchen thermometer to check dough temperature before rolling. If it's above 80°F, pop it back in the fridge for 15-20 minutes. This patience prevents dense, gummy babka and ensures those beautiful flaky layers we all crave.
Filling Consistency Secrets
The chocolate filling needs to be thick but spreadable—like pudding consistency. I've found that melting chocolate with heavy cream (not water) creates a smoother texture.
For extra richness, add 1 tbsp melted butter to the filling while it cools. This prevents cracking when baked and makes every bite more decadent.
If your filling gets too thin, simmer it for 2-3 minutes to reduce slightly. Too thick? Warm it in 10-second bursts in the microwave. The perfect consistency should hold its shape when piped but still spread smoothly with a spatula.
Precision Rolling Technique
Rolling the dough evenly is critical for consistent swirls. Use a 12-inch rolling pin and roll from the center outward, applying even pressure. The dough should be ¼-inch thick throughout—thicker spots won't bake evenly. I like to rotate the dough 90 degrees after each roll to maintain perfect dimensions.
For the chocolate spread: use an offset spatula to create an even ½-inch border around the edges. This prevents filling from leaking during baking. When rolling, keep tension even—too tight and the filling squirts out; too loose and the swirls won't form properly.
Baking Time Mastery
Babka's doneness is determined by internal temperature and visual cues. The perfect babka reaches 190°F at the center while developing a deep golden brown crust. I start checking at 35 minutes—earlier than most recipes suggest—to avoid overbrowning. If the top browns too quickly, tent loosely with foil.
For that bakery-style crackly top, brush with 2 tbsp melted butter immediately after removing from oven. Let it cool on a wire rack for 10 minutes** before slicing—this crucial step prevents filling from oozing out and gives those clean cuts we all love. 💫
Nutrition facts
Frequently asked questions
Can I make babka without a stand mixer?
This recipe works perfectly with a hand mixer or even by hand. For the kneading step, use a dough scraper to fold and stretch the dough for 15-20 minutes until smooth. Just be patient—it takes more elbow grease but achieves the same result. The key is consistent pressure to develop the gluten properly without overworking it.
Why did my babka turn out dense instead of light?
Dense babka usually means one of three things: overmixing the dough (which develops too much gluten), butter that melted too early during mixing, or insufficient rising time. Keep your dough between 75-78°F and let it rise until doubled in size—both are critical for that signature light texture. If your kitchen is warm, chill the dough for 30 minutes before rolling.
How do I store babka for maximum freshness?
Wrap cooled babka tightly in plastic wrap and store at room temperature for 3 days—it stays fresh longer than most baked goods! For longer storage, slice and freeze pieces for up to 3 months. To serve, thaw slices at room temperature or warm in the oven at 350°F for 5-10 minutes to restore that bakery-fresh texture.
Can I substitute the chocolate filling with something else?
Yes! Try a vanilla filling by mixing 1 cup softened butter, 1.5 cups powdered sugar, 2 tbsp vanilla extract, and 1 egg yolk—it creates beautiful golden swirls. For fruit lovers, swap in a lemon curd or strawberry jam filling (reduce liquid slightly to prevent sogginess). The key is keeping fillings thick and flavorful to complement the rich dough.
Do I need to braid the babka after cutting?
No braiding is required! The diagonal cuts you make before baking create the swirl effect when it rises. Simply brush the top with melted butter and powdered sugar after baking for that classic finish. The cuts allow the filling to peek through beautifully while keeping the structure intact—no extra shaping needed.